week thirteen


For my healthy cooking I chose a recipe from my Cooking Light SuperFast Suppers cookbook that I had been wanting to make for awhile but it had never been at the very top of our list of meals to try. It had, in fact, been on the meal list the last two weeks, but was bumped both times for leftovers or eating out. This seemed like the perfect week to actually keep it on the meal plan.
The recipe comes from the “have it your way” section of the book. The idea is that you start with a “Basic Pasta" recipe and then customize your own sauce. The Basic Pasta makes enough for five servings and then each sauce recipe makes enough for one serving. You can try different sauces, or each person eating can choose their own sauce. I decided to try the Roasted Red Pepper Pasta (because, hello, roasted red peppers and balsamic vinegar in the same recipe? Sign me up) and the Asian-Style Pasta. I had high hopes to love this meal, but my overall reaction to both sauces was, “Meh.” It was fine. I wanted to love it and it was just fine. (For some reason that sentence makes me think of “I gave her my heart and she gave me a pen.” Go figure.) I enjoyed dipping my breadsticks in the Roasted Red Pepper Sauce, if that counts for anything. The Asian-Style Pasta was slightly spicy for my taste, but that could be adjusted by cutting down on the crushed red pepper. Somebody’s response was, “You sure used a lot of dishes to make this.” Which is, I think, code for, “This was SO not worth my having to wash all those dishes.”
The recipe was easy to follow but I don’t think we would make either sauce again. There are too many other delicious pasta sauces out there to waste time and energy (and dirty dishes) on these.
But because I don’t want to leave you without something delicious to eat, here is the recipe for the best breadsticks in the world. I might be slightly biased because this is my mom’s recipe and these are the breadsticks I grew up eating, but I think they are great. My sister does something magic to them when she makes them and they get all toasted buttery on the bottom. I haven’t figured out how she does that…
Bread Sticks

Seriously? A Regional Favorite? It’s kind of unfair to ask that of a poor Kansas girl. What do we have here? Wheat? So, I could make bread? Corn? Okay. Oh? The BBQ? That’s right. We’ve got the BBQ. Sadly, I have already perfected the at home BBQ ribs, so I couldn’t use that for this challenge. I opted for a slow-cooker word-of-mouth recipe for country-style pork ribs and then tried a new recipe for baked corn. Yes, I tried two new things. Please send my award as soon as possible.
Slow Cooker County-Style Pork Ribs
Ingredients:
Some county-style pork ribs
Water
BBQ sauce
Let me just save you a little trouble and tell you to get this sauce. ‘Tis awesome.

Directions:
Place all ingredients in slow cooker and cook. Enjoy.
This was pretty much how I got the recipe, and considering it was a word-of-mouth pass along, I guess I should be happy I remembered that much. I shall fill in the details for you now. I used a 2-quart slow cooker, which was the perfect size for the 2 pounds of county-style ribs we used. I put them in the slow cooker thawed, then added about a cup of BBQ sauce and about ¼ cup of water. I brushed the sauce around to coat the ribs, but I don’t think that is absolutely necessary. The ribs should be cooked on high for four hours. If you haven’t really cooked this kind of meat in a slow cooker before, and are used to cooking things on low, and remember that the person who gave you the recipe said it was done in about four hours, and so you cook your ribs for four hours on low, they will not be done in time for dinner. Well, they’ll be cooked enough to be edible, but they won’t be really fall-off-the bone delicious until bedtime. I’m just saying.
The recipe turned out to be a challenge for me because it lacked information vital to my success (cooking temperature and time) but now that I’m armed with that information I will certainly make this again. It is super simple and delicious. Baked Corn I wanted to do something with corn because we have lots of fresh corn coming out of the garden and Kansas is kind of a corn state. This time of year the corn fields line every highway and everything looks green and lovely. I love the corn fields. Recipes that use fresh corn? Not so easy to come by. I ended up going with this recipe for Baked Corn because the reviews said things like, “This is requested at every holiday meal.” And, “OMG my family LOVES this.” Rave. Rave. Sadly, we must disagree. It’s kind of like a cornbread with whole corn kernels. And, as the recipes states but I didn’t really notice until it was too late, it makes a 9x13 pan, which is way too much for the two of us.
  We did eat it for dinner, and then a little more at bedtime when the meat was finally yummy, and then for leftovers the next day, and it did not get any better. It probably would have been better if I had eaten it as if it WERE just cornbread—with butter and honey. We try hard not to waste food around here, but we ended up throwing out about half the pan when we both decided we just couldn’t eat anymore. I totally should have just served fresh corn on the cob. The recipe was easy to follow and the result was edible, but we won’t be making this again.
Just in case you want to try some AWESOME BBQ ribs, here you go:
BBQ Ribs (original recipe yields 4 servings)
Ingredients:
2 1/2 pounds country style pork ribs
1 tablespoon garlic powder
1 teaspoon ground black pepper
2 tablespoons salt
1 cup barbeque sauce (but seriously, you'll need more)
Directions:
After spending hours and hours trying to decide what on earth would qualify as a "guilty pleasure" food (to the point where Somebody reminded me that the baking challenge shouldn't take over my life) I finally decided that chocolate ice cream, GOOD chocolate ice cream, would fit the bill for me. It is something that I rarely buy, but love to eat. And when I DO buy it, generally I consume the entire package in one sitting. Was that too much information? My chocolate ice cream of choice is Ben and Jerry’s Chocolate Fudge Brownie ice cream, so I went looking for a recipe that duplicated that as much as possible.
Surprisingly, even though Ben and Jerry have a cookbook published with their ice cream recipes, I could not find a copy in any of my local libraries. Libraries? Hello? Surely I'm not the only person who wants to duplicate the yummy ice cream. Dear my Librarian Friends: You should totally get on that.
Without the official recipe to follow, I turned to the Internet world of copy cat recipes. Low and behold, there IS no copy cat recipe for the Chocolate Fudge Brownie ice cream. What the? Shame on you, Internet. I had to settle for the Chocolate Fudge copy cat recipe and then I just added in some of my own brownies. Well, technically they were Betty Crocker's brownies, but whatever.
Ben and Jerry's Fudge Ice Cream
Ingredients
4 oz unsweetened chocolate
1 cup milk
2 large eggs
1 cup sugar
1 cup heavy cream, or whipping cream
1 tsp vanilla
1 pinch salt
Directions: (my notes and observations are in italics)
1. Melt chocolate in double boiler over hot (not boiling) water. (I don't have a double boiler. I improvised with a glass bowl over a pot and it worked just fine.) 2. Gradually whisk in milk, stir until smooth. Remove from heat; let cool. (When I added the first little bit of milk the chocolate started seizing up and I completely freaked out and wondered if I had ruined the recipe on Step 2. Luckily, I kept stirring and adding more milk and eventually the whole mess smoothed out and came together. So just keep stirring.)
 3. Whisk eggs in a mixing bowl until light and fluffy, 1-2 minutes. (For all these whisking directions I used a hand mixer. Because I have delicate wrists.)
4. Gradually whisk in sugar, then continue whisking 1 minute longer until completely blended.
5. Add cream, vanilla, and salt; whisk. (Again with the whisking. Aren't you glad you used the hand mixer? I thought so.)
6. Add the chocolate mixture; blend well. (Blend. Whisk. Same thing.)
7. Cover, chill, and freeze according to ice cream maker's directions. (I chilled mine overnight in the refrigerator and put it in the ice cream maker the next morning after I made brownies. Note: brownies for breakfast = yum. Also healthy.)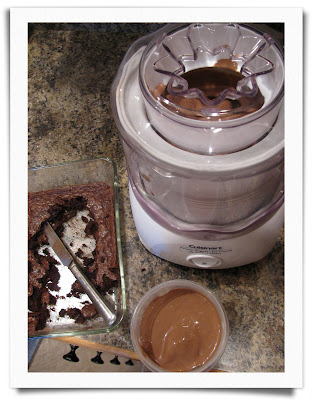 Yield: makes 1 quart.
I reserved some of the ice cream before I added the brownies so that I could review the recipe as it was written. The rest of the ice cream I broke off little bits of the brownie (the gooey middle part, not the top crust or edge part) and dropped it into the ice cream maker. I noticed this made the brownie pieces break up even more, so I also added some larger pieces when I had removed the ice cream from the machine. I just stirred these larger pieces in by hand so there would be obvious brownie. When I make this again, and I WILL make this again, I would do more of the "stir in by hand" pieces because I thought they worked better.
Directly out of the ice cream machine the ice cream was very, very soft. After four hours in the refrigerator it was firmer, but still creamy and easy to scoop. After sitting all day and overnight in the freezer it was much firmer. I liked that it never got so solid that it was difficult to snitch some out with a dinner spoon. There was much snitching. This recipe was super basic, but the steps are clear and easy to follow. I liked that it didn't require any fancy or expensive ingredients--almost all the ingredients are things I always have in the pantry. Somebody and I LOVED this ice cream. It is not very sweet and very chocolatey. If you eat a cinnamon roll and then eat this ice cream it will taste bitter. Trust me on that one. But in general, assuming you don't regularly eat a cinnamon roll and decadent chocolate ice cream in one night, it is just sweet enough. I think it tastes almost exactly like Ben and Jerry's Chocolate Fudge Brownie ice cream. I might have polished off most of it in one sitting. Maybe. You'll never know.
I decided to participate in the Whip It Up 2009 challenge, and here it is the first week and I already feel behind. I'm blaming most of this on the fact that I spent the first half of this week in Utah and so only had a few days to come up with a recipe, make it, and then post. Lucky for you I saved all of those tasks until this morning. As the theme for this week is holiday food, and as today is a holiday, I figured that anything I made today would qualify as holiday food. And because I was making dessert for a holiday BBQ this evening, I figured adding one more thing was going to be a breeze. I could not have been more incorrect.
First, the mini pies with star tops that I was planning for dessert tonight didn't turn out at all. It could have been because I ignored the advice to use store-bought pie crust and pie filling (hello! My recipe for both pie crust and cherry filling are awesome, so why would I compromise and use something from the store?) and then didn't have the correct size cookie cutter for the cute star pie top. Tragedy. After the first batch went woefully awry, I knew I had to come up with a back-up dessert. One batch of lemon blueberry cheesecake and one batch of cherry cupcakes later, I was all baked out. Actually, somewhere in the middle of these two things I became baked out. And I still didn't have a new-to-me recipe for the challenge!
It was right about lunch time when I decided that I would have to make something that would qualify for the challenge AND lunch, and the Internet didn't disappoint with Brown Sugar Bacon Waffles from Joy the Baker. Why, hello there, holiday brunch!
And here, friends, is where I become one of those annoying Allrecipes.com reviewers who are all, "I substituted orange juice for the milk, cinnamon for the nutmeg, and doubled the eggs, and this recipe was horrible!" My whole goal was to avoid using the oven as it was already busy cooking the cheesecake and cupcakes. So I improvised. I pulled out my Makin Bacon and attempted to get the caramelized brown sugar bacon (clearly the star of this recipe and clearly only attained by baking the bacon in the oven) in the microwave. Fail. Does not work. Evidence below. I went ahead and put that bacon in the waffle batter anyway, because, well, I had to do SOMETHING. And they turned out okay. For some reason my waffles are much thinner than Joy's, and the bacon really has more of a charred flavor than a caramel flavor, but they were good.
 Seriously, though. Waffles? With brown sugar? And bacon inside? Served with strawberries? These couldn't go too far wrong. The recipe was very easy to follow (and this would have turned out much more scrumptious if I had followed it exactly), it was pretty quick to make this (which is ALWAYS a good thing, especially for a holiday brunch), and the resulting waffles were yummy to eat. I would make this again.


