Somebody was VERY excited when he heard that the challenge category for this week was “spicy.” He loves the spicy. I don’t love it the way he does, and, in fact, before we got married considered mild salsa to be spicy. I have come a long way in my spice tolerance in the past three years, but still am no where near his level. Of course we went with Chinese food, because for him there is no better place to have spice than in Chinese food. Lucky for me, we already own three great Chinese cookbooks. Somebody ordered these a little while ago because he knows that the author is a great chef. Apparently she is the Taiwanese equivalent of Julia Child, or Emeril Lagasse, or Bobby Flay. You know—a cooking superstar.
 I’m sure you aren’t surprised that Somebody is in charge of all the Chinese cooking that goes on in our house. While I consider myself fairly skilled in the kitchen, the cooking methods used in Chinese cooking are still pretty foreign (ha ha) to me, and I’m not confident following his directions. Especially because so much of his cooking is based on the look of the food, or the smell, or feel, or whatever—it takes some practice and up until now I haven’t had any practice. I think that Somebody had probably given up hope that he would ever come home from work and find I had made a Chinese meal, but after tonight he has started saying things like, “Just a few more of these recipes and you’ll be able to prepare the full three dishes.” And, “You make a wonderful Chinese wife.” Both of those statements made me laugh. The full three dishes? What the? One is not enough? Apparently, no. And, yes, with practice and direction I’m turning out to be a lovely Chinese wife. Whatever. I’m pretty much the opposite of a lovely Chinese wife, but that’s why he loves me so much.
Anyway, on to the recipe. The beauty of Pei Mei’s books is that recipe has a photo so you know what the end result should look like, and, more importantly, each recipe is given in English and traditional Chinese characters. While you don’t need to be able to read any Chinese to follow the recipes, more than once Somebody read through the Chinese recipe to get a better understanding of what the English was trying to say. You should totally hire a translator when you make this. I know a good one.  I am going to give it to you exactly as it is written, and then my notes and changes are at the end.
Chicken with Gongbao Sauce (you might know it as Kung Pow Sauce)
Ingredients:
2 chicken legs or 300 g. chicken breast
10 pieces dried red chili
½ cup peanuts
1 tsp chopped ginger
Seasonings (1):
1 Tbsp soy sauce
2-3 Tbsp cornstarch
1 Tbsp water
Seasonings (2):
2 Tbsp soy sauce
1 Tbsp wine
1 Tbsp sugar
1 tsp cornstarch
¼ tsp salt
½ tsp sesame oil
Directions:
1. Remove all bones from chicken, cut into 2.5cm cubes, marinate in Seasonings (1) for 30 minutes.
2. Wipe dried chili, cut into 3 cm long pieces.
3. Fry chicken in heated oil for 40-50 seconds. Remove chicken.  4. Heat 1 Tbsp oil to fry dried chilies until it turns dark red, add ginger and chicken, stir fry quickly, add Seasonings (2), stir until evenly mixed, turn off the heat. Add the peanuts, mix well and serve.
  We served this over white rice, garnished with cilantro, and ate with chopsticks. Please don’t make this unless you have chopsticks. It’s, like, a crime to cook this authentically and then use a fork.
 My notes and tips:
- We used two chicken thighs with the skin and bones removed. This made just enough for the two of us for dinner. Somebody said that we could have doubled the amount of chicken and still used the same amount of sauce, but I kind of liked having a little extra sauce to flavor the rice.
- I did not wipe off or cut the red chili peppers. I didn’t wipe them because Somebody said I didn’t have to. I have no idea why not. But he’s the expert here so I just went along with it. I didn’t chop them because I didn’t want this to be too spicy to eat. I just chose small peppers. Also, and this I didn’t know beforehand, but when the dish is finished you don’t eat the red chili peppers. You just pick them out, sort of like you would a bay leaf. They are just there to add some flavor to the oil and to give a little heat. All the spice/heat in this dish comes from the red chili peppers. Because I didn’t cut them, and so didn’t release any of the seeds, this ended up being not spicy AT ALL. Not at all. I was shocked. Somebody was completely disappointed with how non spicy it was. It was absolutely delicious, but not spicy. If you want heat, just cut open your chili peppers. Oh, and you can find dried red chili peppers in the fresh fruit/veggie section of most grocery stores—they will be in the little section that has ethnic foods.

- All cooking (frying and stir frying) is done on high heat.
- I used ¾ cup oil to fry the chicken because I was using a flat, non-stick pan. If I had been using a wok I would have only needed about 1/3 cup oil.
- The directions say to fry the chicken for 40-50 seconds. I cooked it a little longer—not more than two minutes—just until the chicken was no longer pink and looked completely cooked.

- If using a non-stick pan, which we did, you don’t need to add the extra 1 Tbsp of oil to cook the chilies. I just dumped out the oil that had cooked the chicken, didn’t wipe out the pan completely, and just used the light coating that remained in the pan to cook the chilies. If you are going to use a wok, you would need to add in the extra oil.
- I fried the red chili peppers for about 30 seconds (they didn’t seem to change color, so I just went with when Somebody told me they were done) before adding the ginger and chicken. Also, and consider this your warning, although leaving the peppers whole made it so that EATING this was not spicy, I absolutely felt the heat of the peppers while I was frying them. Seriously. There was much coughing and gagging and not breathing for the 30 seconds the peppers were frying. The fumes killed me. I’m just a ghost writing these great tips for you. The ghost of a good Chinese wife.
- Just in case you don’t have white wine, or cooking wine, or Chinese rice cooking wine like we have…
 …you can just use a tablespoon of water. Or just take it out of the recipe. Somebody says that the wine is just there to remove the chicken-y smell from the cooking. What huh? Whatever. So, don’t feel the need to put on sunglasses and a baseball cap and go to the grocery story across town just to purchase the wine for this recipe.
 - Once the Seasonings (2) was added, I cooked it for about one minute before removing it from the heat and serving it. Chinese food is always served hot, hot, hot, so be ready with your rice so that you can eat as soon as this is done.
- When I make this again we will reduce the amount of soy sauce in Seasonings (2) to 1 ½ Tbsp, and would increase the ginger slightly.
Make this tonight. This recipe is so easy and comes together very quickly. From start to finish I think it only took about 45 minutes, and that included the time it took to de-bone the chicken and marinate it. I am not sure if I would have been as successful making this as it was printed without Somebody watching over my shoulder and giving me tips. Now that I’ve done it once I’m confident that I could do it again without assistance. If you need me to come and watch over your shoulder, just let me know.

 ...but this year I got to take this handsome fellow with me.
 And I think that more than makes up for it. If you are in the Kansas City area and want some sunflower pictures of your own (think family photos for Christmas cards), you can find directions to the sunflower field here.
  Chinese Sesame Chicken
 4. Just before you’re done frying, bring the sauce back up to a boil. Place chicken in a serving dish and pour sauce over. Sprinkle with sesame seeds. Serve with rice.
 I learned a couple of things while making this. First, if you are only serving two people you probably only need one pound of chicken. I used only one pound of chicken and still made the full marinade and sauce recipes. Yum. I like lots of sauce. Second, I hate deep frying. ‘Tis messy and can be painful when the oil spatters out and burns your hand.
  Multiple times during the painfully slow frying process (I was totally following the “add marinated chicken a few pieces at a time” direction and it took me almost half an hour to fry up my one pound of chicken.) I mumbled in frustration, “This is so lame. I hate this recipe. I would never make this again.” And third, I would totally make this again. Yum! It only took one bite before I was eating my words right along with this delicious chicken.
  My notes and observations are in parenthesis. We doubled this recipe because we were feeding more than two people.
 To marinate beef:
 4. Reheat the juice, then add green onion. Stir fry only for 5 seconds. Turn off the heat. Pour the beef back into the pan. Combine with green onion and add sesame oil. Transfer to a serving plate.
 Oh, and because you were all curious, we got our squid at the grocery store at the military post. You could probably find it already cut up, but we were going for squid we could also use in other Chinese recipes. Hence the whole squid. Again, SO not worth making the calamari at home. Make this Beef with Green Onion instead. You won’t be sorry.
 Somebody and I both enjoy calamari as an appetizer at restaurants and have ordered it many times. Our favorites are California Pizza Kitchen (Well, this is one of my favorite places to have it—mostly due to their dipping sauce. But when I went to look for recipes to make at home I tried to find calamari on their online menu and it wasn’t listed anymore. Anyone know anything about that?) and that one restaurant in Boston that we went to with Melissa and James. That was amazing. And yet it is always one of those things where we would say, “I can’t believe we are paying $7.95 for this. We could totally make this at home.” And so we did.
 Reason number two why we won’t make this again: The breading needed more kick to it. Using just a half teaspoon of cayenne worked with the Onion Strings, but the calamari definitely needed more.
 Reason number three why we won’t make this again: In the end, our stovetop looked like this:
 That’s enough reasons, right? They were fine. We ate some. And then we threw the rest away. It is absolutely worth paying $7.95 to have someone else prep and clean up after this appetizer.

 I had high hopes to love this meal, but my overall reaction to both sauces was, “Meh.” It was fine. I wanted to love it and it was just fine. (For some reason that sentence makes me think of “I gave her my heart and she gave me a pen.” Go figure.) I enjoyed dipping my breadsticks in the Roasted Red Pepper Sauce, if that counts for anything. The Asian-Style Pasta was slightly spicy for my taste, but that could be adjusted by cutting down on the crushed red pepper. Somebody’s response was, “You sure used a lot of dishes to make this.” Which is, I think, code for, “This was SO not worth my having to wash all those dishes.”


 Baked Corn I wanted to do something with corn because we have lots of fresh corn coming out of the garden and Kansas is kind of a corn state. This time of year the corn fields line every highway and everything looks green and lovely. I love the corn fields. Recipes that use fresh corn? Not so easy to come by. I ended up going with this recipe for
  We did eat it for dinner, and then a little more at bedtime when the meat was finally yummy, and then for leftovers the next day, and it did not get any better. It probably would have been better if I had eaten it as if it WERE just cornbread—with butter and honey. We try hard not to waste food around here, but we ended up throwing out about half the pan when we both decided we just couldn’t eat anymore. I totally should have just served fresh corn on the cob. The recipe was easy to follow and the result was edible, but we won’t be making this again.
 2. Gradually whisk in milk, stir until smooth. Remove from heat; let cool. (When I added the first little bit of milk the chocolate started seizing up and I completely freaked out and wondered if I had ruined the recipe on Step 2. Luckily, I kept stirring and adding more milk and eventually the whole mess smoothed out and came together. So just keep stirring.)
 3. Whisk eggs in a mixing bowl until light and fluffy, 1-2 minutes. (For all these whisking directions I used a hand mixer. Because I have delicate wrists.)
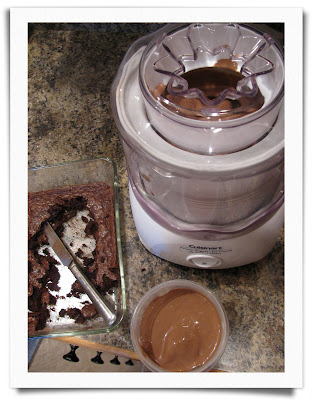 Yield: makes 1 quart.
 This recipe was super basic, but the steps are clear and easy to follow. I liked that it didn't require any fancy or expensive ingredients--almost all the ingredients are things I always have in the pantry. Somebody and I LOVED this ice cream. It is not very sweet and very chocolatey. If you eat a cinnamon roll and then eat this ice cream it will taste bitter. Trust me on that one. But in general, assuming you don't regularly eat a cinnamon roll and decadent chocolate ice cream in one night, it is just sweet enough. I think it tastes almost exactly like Ben and Jerry's Chocolate Fudge Brownie ice cream. I might have polished off most of it in one sitting. Maybe. You'll never know.

 Seriously, though. Waffles? With brown sugar? And bacon inside? Served with strawberries? These couldn't go too far wrong. The recipe was very easy to follow (and this would have turned out much more scrumptious if I had followed it exactly), it was pretty quick to make this (which is ALWAYS a good thing, especially for a holiday brunch), and the resulting waffles were yummy to eat. I would make this again.


